
Wardrobe
How to Photograph Clothes for a Digital Wardrobe
Soft window light, a plain background that contrasts with the garment, the whole piece in frame, and the same setup every time. Here is when to use a flat lay or a hanger, which phone settings matter, and the mistakes that change colors.
In this guide
To photograph clothes, use soft daylight from a window, lay or hang one garment against a plain background that contrasts with it, and shoot the whole piece straight on with your phone's main lens. Turn off flash, filters and portrait mode, and keep the same setup for every item so the photos look consistent.
For a digital wardrobe, you need a picture you can recognize later, not a campaign image. If every thumbnail looks like a crumpled dark shape, the digital closet does not help you choose.
This is the capture guide. For what to do with the photos, see what a digital wardrobe is and how to organize one you will actually use.
What a useful clothing photo needs
You should be able to answer three things from the image alone:
- What kind of garment it is.
- Its color and general shape.
- Where it starts and ends: hem, sleeves, straps, shoes as a pair.
If you cannot tell a charcoal knit from a black one, the photo is not doing its job. Beauty is optional. Legibility is not.
Flat lay, hanger or on the body?
Scroll the table sideways if you need more room.
| Method | Best for | How | Watch out for |
|---|---|---|---|
| Flat lay | Knitwear, T-shirts, jeans, shorts, bags | Smooth the piece on a floor or bed and shoot from directly above | Structured jackets lose their shape; a tilted phone distorts proportions |
| Hanger | Shirts, jackets, coats, dresses | Plain hanger on a door or hook; stand square to it | Slippery fabrics twist; long hems get cropped |
| On the body | Seeing length and drape, logging an outfit | Mirror, or someone else holds the phone | The garment is harder to isolate, and you are in the picture |
Flat lay and hanger cover almost everything. Shoes should be a pair, photographed from a three-quarter angle so the shape is obvious. Bags can lie flat or stand upright; either way, keep the strap inside the frame. Keep on-body photos for outfit records.
Set up once, then repeat
Clothes photography at home does not need a studio. It needs repeatable conditions.
- Background: Use a plain bedsheet, a door, a wall, or a floor with little pattern. Pick one that contrasts with the garment: a pale sheet for dark clothes, a gray wall or wooden floor for white ones. Matte beats shiny. Busy tiles make edges harder to see.
- Distance: Include the whole item with a little space around it. Cropped hems and cut-off shoes are how similar trousers become indistinguishable.
- One job per frame when you can: A single hanging shirt is easier to review than a pile. If you photograph several pieces together, plan to check each saved item.
You do not need a mannequin. You do not need to iron every piece perfectly. Wrinkles are fine if the garment is still identifiable. A ball of fabric is not.
Light: time of day and window position
Light matters more than the camera. Soft, indirect daylight shows color most accurately.
- Bright overcast days, or a window out of direct sun, give even light and gentle shadows.
- Midday sun through the glass creates hard shadows and glare. Move the garment out of the sunbeam, or hang a thin white sheet over the window.
- Early morning and late afternoon light is warmer and can turn white into cream. Shoot the whole batch in it so the photos at least match.
- Evening: turn off mixed lamps and use one light source. A warm lamp plus a cool ceiling light gives patchy color.
Put the garment near the window with light falling from the side, and stand where you don't cast a shadow. Never put the window behind the garment; backlight turns it into a silhouette. A white sheet or card opposite the window bounces light into the shadows.
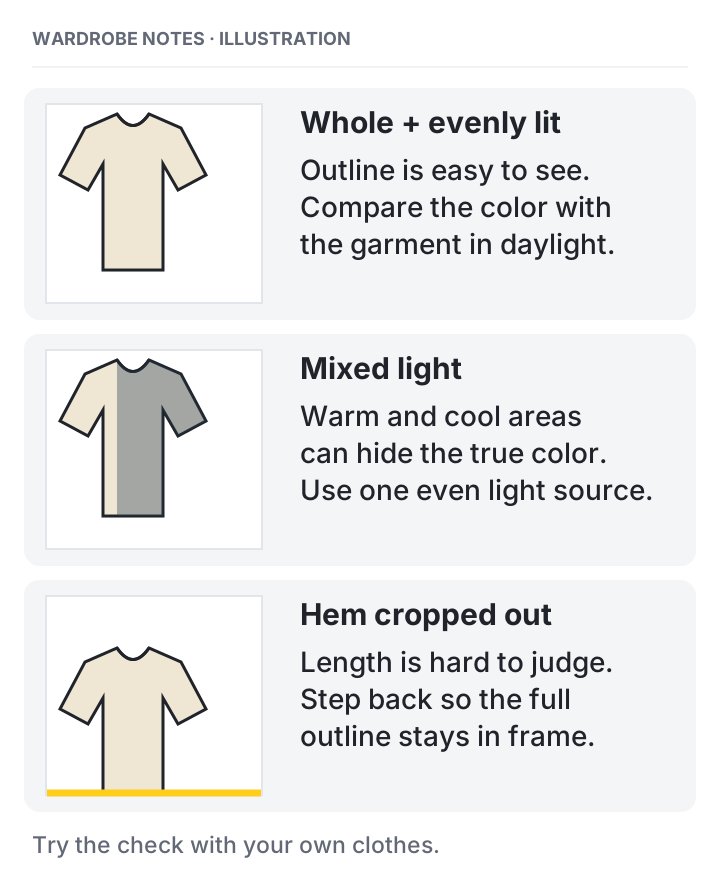
Setup illustration, not a camera test or an AI result. Use it to check three things before uploading: the full outline is visible, light is even, and the color resembles the garment in front of you.
How to photograph clothes with your phone
- Use the main lens at 1x and move closer instead of zooming. Digital zoom loses detail, and the ultra-wide lens bends edges near the frame.
- Turn on gridlines. They help you hold the phone parallel to a flat lay and center a hanging piece. On iPhone it's Settings > Camera > Grid; most Android camera apps have a similar option.
- Lock focus and exposure. Press and hold on the garment until the camera locks, so brightness doesn't jump between shots. Nudge exposure up for black clothes until the texture shows, and down for white so it doesn't glare.
- Turn off flash. It flattens texture and puts a hotspot on shiny fabric.
- Skip portrait mode for item shots. It blurs whatever it reads as background, which can soften a sleeve, strap or hem.
- No filters or beauty presets, and wipe the lens. A smudge makes everything look hazy.
A simple sequence that does not take all weekend
Photograph the clothes for one real week, not the whole house.
- Pull the items onto a bed or rack.
- Take the photos in one lighting condition.
- Review them immediately: is the color roughly right, and is the whole piece visible?
- Add them to your wardrobe and correct the category or color if the suggestion is wrong.
- Stop. Build an outfit from that set before you photograph anything else.
Common mistakes
Scroll the table sideways if you need more room.
| Mistake | What goes wrong | What to do instead |
|---|---|---|
| Shooting at night under mixed lamps | Colors shift; navy becomes black | Wait for daylight or use one consistent light |
| Black garment on a dark background | Edges disappear | Use a pale background and raise exposure slightly |
| Shooting a flat lay at an angle | The garment looks shorter or wider than it is | Hold the phone flat above it, using gridlines |
| Only photographing the print or logo | You cannot see the silhouette | Step back until the full garment is in frame |
| Leaving other people in the shot | Privacy problem, and the item is harder to isolate | Photograph the garment, not the wearer, unless you intend a try-on photo |
| A different messy background every time | Thumbnails do not scan | Repeat the same wall, floor, or sheet |
Photos for try-on are a separate, stricter case
A wardrobe thumbnail can be a little imperfect. A virtual try-on needs more: a clear garment image and one clear, well-lit, full-body photo of you that you are comfortable using. Review the privacy policy before you upload either.
Do not use someone else's picture. A try-on is a preview, not proof of fit, so compare it with the real garment. How AI virtual try-on works covers what the image can and cannot show.
What to do after you shoot
A camera roll is not a wardrobe. In Fashion Frame, add photos with Add clothing in Wardrobe on the web, or the + button in the app; the app finds and cuts out each item and suggests a category, and you review each one, correcting the category, colors and tags, before you add it. Then create one outfit from those pieces. If the photos helped you get dressed, photograph the next group. If they did not, fix lighting and framing before you scale up.
Photograph so you can recognize the piece later. That is the whole standard.
Common questions
Do I need a white background to photograph clothes?
No. You need a plain, repeatable background that contrasts with the garment, and even light. A pale sheet works for dark clothes; a gray wall or wooden floor works for white ones.
How do you take pictures of clothes without a mannequin?
Use a flat lay for knits, tees, trousers and bags, and a plain hanger on a door for shirts, jackets and dresses. Keep the whole piece in frame and shoot straight on.
What's the best way to photograph clothes with a phone?
Use the main lens at 1x in soft daylight, lock exposure on the garment, and turn off flash, filters and portrait mode. Consistency matters more than the phone model.
Can I use photos from shopping sites?
Those pictures are often well lit, but they may not match the garment you own: color, wear and cut can differ. For a wardrobe you will dress from, photograph the actual piece.
How many photos per item?
One clear photo is enough. Pick the angle that shows what you need to recognize, such as a three-quarter view for shoes, and retake it if the first hides that detail.
Put the guide into practice
Start with your own wardrobe.
Photograph a few everyday pieces and organize them in your digital wardrobe.
Try Fashion FrameContinue reading
Wardrobe
What Is a Digital Wardrobe? A Practical Guide to Starting One
A digital wardrobe, also called a digital closet or virtual closet, is a photo record of the clothes you own. Here is what to include, how to digitize your wardrobe in batches, and how to choose a wardrobe app.
Wardrobe
How to Organize a Digital Wardrobe You Will Actually Use
Keep your digital wardrobe useful after the first upload: correct categories, handle duplicate records carefully, and update saved outfits when clothes change.
AI Fashion
How AI Virtual Try-On Works
AI virtual try-on creates a styling preview from a person photo and selected clothing. Learn what the image can show and what still needs a real fitting.